Written By: Tara Jennifer
The very first thing to learning film photography is purchasing a camera. Hopefully you navigated to this blog because A) You just bought one! OR B) You are contemplating it. Either way, I know how overwhelming this can be when you don’t know much about film camera’s and are even more confused with all the buttons on the camera and exactly what they do. Well here I am to help guide you through the first steps to take when starting out, because I, myself, did not have any of this information. Although learning film was the best thing I have done for my education and growth in photography to this date.


1. Choosing Your Film Camera
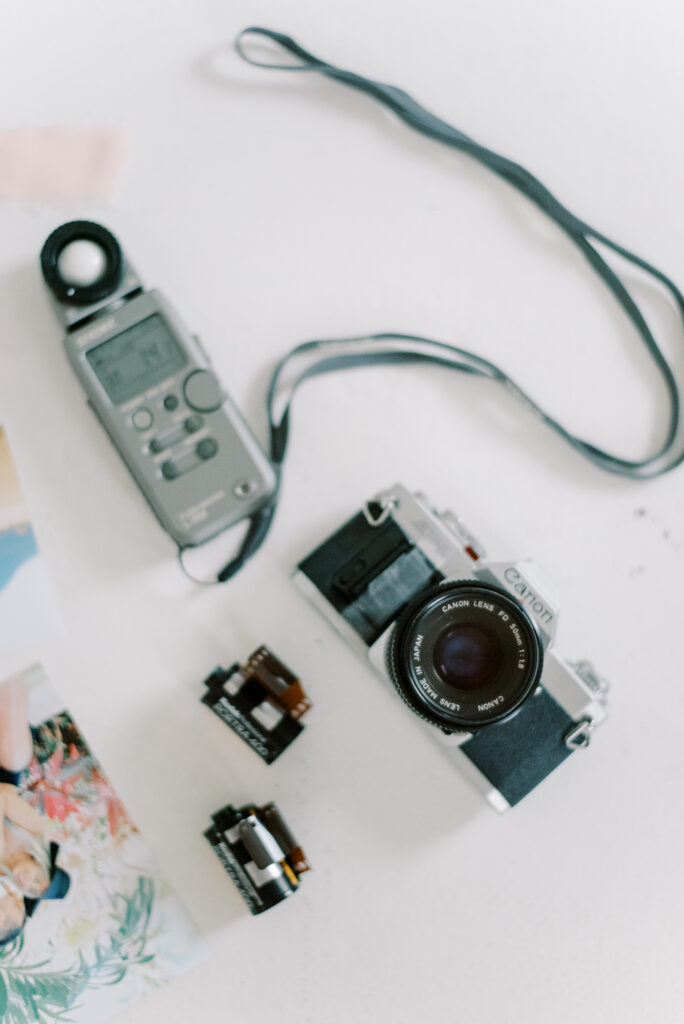
The FIRST thing I recommend is finding a film camera with an internal light meter. This is a meter inside the film camera that will let you know if your photo is properly exposed (enough or too much light). For someone with little experience it will be very helpful to guide you on shooting your first few rolls of film. If not, you can always buy a hand held light meter, but that will just add up in costs for someone just starting!
The SECOND big decision is knowing if you are going to buy a manual or automatic film camera. This essentially means that the camera will either focus and slide the roll of film through your camera on its own, or you will have to do it manually after every shot. There are no better options here, it pretty much depends on your speed and efficiency of taking the photos. I started with a manual camera myself and I think it is safe to say everyone should! Automatic film cameras are nice for motion photography or simply just not having time to focus and wind the film after every shot!
The THIRD decision to me is the most important decision. Film camera’s often come in TWO different shooting modes:
Camera Mode’s
A. MANUAL MODE: (my personal favourite) All this means is you have full control of the 3 major camera settings, which we discuss below on what they mean. Personally having this control will only make your images better. This is always what I recommend.
B. APERTURE MODE: This mode means that the camera determines what the shutter speed will be for the image depending on the light. You can not control this on the camera, meaning sometimes your photos could come out not exactly how you wanted them (wanting them to be a little over exposed or under exposed)
2. Choosing Your Film Stocks
FILM STOCKS: This is the fun part! At the beginning of learning film it is fun to play around with certain film stocks and see which you like the most. I always say these are like the filters you select for your photos. However, there is only ONE main thing you should know to start:
The number on the film. These are often 100, 400, 800, 1600 and so on. All this means is the ISO setting. So when you put it in your camera you will have to set the cameras ISO to this number. We will talk ISO again here soon! Essentially the lower the number you want to select for bright scenarios, and the higher number is for darker, non-lit spaces.


3. The THREE Settings You Must Know When Learning Film Photography
1. ISO:
This is the basic setting of “light” in photography. It just means how sensitive the camera’s sensor is to light. However in film, this is already set for you. Depending on which film stock you buy, like mentioned earlier, the lower numbers like 100, 200, 400 are for well lit days/circumstances. Over 800-6400 are for darker circumstances. Really this setting is easy once you decided what film you have bought, just slip it in the camera and set the ISO and leave it.
2. APERTURE (f/stop):
You know when you see a photo and the background is either very clear or super blurry? This is the setting that controls the depth of field / background of your image but also, can make a difference on how light or dark your photo will turn out. This setting is always found on the lens portion of the camera. The numbers generally go from f2.0-f32. Essentially the lower the number the “blurrier” the background and the lighter the image will be and the higher the number will have a clearer background, but putting it too high could risk the exposure of your image.
TIP: Ask yourself this before you adjust this number: Are you photographing a person which would look beautiful with that blurry bokeh, or a city landscape where you want all elements to be sharp and in focus. This is where Aperture is important, and ALWAYS think of the EXPOSURE (lighting).
3. SHUTTER SPEED:
This is the main setting you control often on the camera. I find myself leaving the other two the same pretty much the whole roll of film. Essentially, the shutter speed is exactly how it sounds. How fast that shutter of the camera will open and close when taking the photo. This really matters for two reasons:
The first again, being the EXPOSURE (lighting) of the photo. The slower the shutter opens and closes (200) the more light that will have time to get into the sensor. The faster(1000) will not give the camera time to allow much light in. Really all settings can control the lighting but I would say shutter speed is the main control.
The second thing to keep in mind: Is there is movement in the photo? Are you capturing cars? Kids running? A bird in the sky? If you have a very low shutter speed like 30, 60, 120 or even 200 sometimes the photo may come out blurry. This is because the shutter is so slow the object has time to move before it has opened and closed again. My rule of thumb is to never shoot below 200 unless it is a stagnant shot and I’m really focusing on being still. This only happens when I am in a darker area of course and need as much help with lighting I can get!

4. Shoot, Shoot, Shoot!
Well, by now, I am sure I have overloaded you with a lot of information, especially if you don’t have a ton of experience with photography in general. Trust me, your first roll will not be perfect and that is 100% expected. Get out and shoot your first roll and just remember the THREE settings from above and you will be just fine! I can guarantee once you get that first roll back and see the photos, despite the lighting and maybe a few blurry images, you will fall in love with the idea of learning film photography. There is something in the magic of waiting for your images and the spark of joy when they hit your inbox.


5. Developing Your Film Photos
I wouldn’t stress over this too much, since you are just starting out. Simple spots in your local city will be enough for now. A common spot here in Canada that I like to use for fast processing is London Drugs. You simply drop off your film and depending on their waitlist you can have your film within 24 hours or 5 days. You can also choose to print the photos or just get digital scans (this is my preference, as you can always print these later.) Some photo labs will ask you for colour or lighting fixes when they develop the film. However, when starting off, I would recommend to opt out of this so you can to truly see how your images are turning out and what may need to be fixed.
MY CURRENT LAB: The Canadian Film Lab
MY FAVOURITE FILM STOCK: Portra 400